Categories
Tutorials WordPress

What Is the Best Way To Accept Payments Through WordPress?

In this tutorial, we’ll talk about some of the best ways to accept payments on WordPress. Spoiler alert: the best way to accept them is through Payment Page!

1. Find a Payment Gateway in Your Home Country

You need to find a payment gateway that accepts credit cards and other types of payment methods in your home country. Many companies support this type of payment method.

On Wikipedia, there are a lot of payment service providers that accept credit cards and other types of payments in your home country. Before you start working with a payment gateway, it’s important that you thoroughly research the various features and fees of the company.

There are a lot of payment gateways that accept credit cards and other types of payments, such as PayPal, 2Checkout, and Stripe. However, there are also many other options.

2. Locate a Compatible WordPress Plugin

Before you start working with a payment gateway, it’s important that you thoroughly research the various features and fees of the company. If you don’t want to pay for a specific plug-in, you can start by searching the WordPress.org repository.

Most plug-ins for WordPress will allow you to accept payments without additional features. However, if you want to add additional features, such as subscriptions or mixed payment options, then a paid extension is required.

Ask yourself the following when investigating WordPress plugins:

•Is there customer support offered?

•What are the reviews?

•Is there enough documentation of the plugin to make an informed decision?

•Will the plugin be easy to set up and use?

•Are there 3rd party integrations available?

Some payment plugins will require you to use a third-party payment gateway to handle the various features of their functions, such as the checkout flow. Some will also require you to use a separate payment engine, such as MemberPress or WooCommerce.

3. Set Up The Plugin and Begin Accepting Payments!

If you decide to use a payment gateway plug-in, you’ll need to make sure that you have the necessary configuration to connect your website to the gateway’s API. This will allow you to securely process payments. The documentation of the payment gateway and the WordPress plug-in should explain the steps involved in setting up the system.

Finding it Difficult to Accept Payments Using WordPress?

There are a lot of articles and guides on how to accept payments using WordPress and PaymentPage. We have a variety of articles and guides that explain how to set up a payment gateway and implement various payment methods. If you have any questions about the payment gateway or the instructions in these articles, please contact our support team.

Payment Page is a fantastic way to start accepting payments on your WordPress site. Check out our pricing for details or download the free version.
Categories
WordPress Accepting Online Payments

Find out if your payment page is user friendly

User-friendly means a payment page is designed to be fast, easy, and accessible to your clients and have the necessary information to complete their transactions. It is also essential that you provide compensation options that are flexible enough to suit your customers’ needs.

How to Find out if your payment page is user friendly

Ask your customers what they think

You can ask them their thoughts by asking them to fill out a short survey. The survey will ask about their experience with the site and if they found it easy to use.

You don’t have to wait for someone to complain about your payment system—there are plenty of places online where people can leave feedback on websites. This can help you make improvements that will improve the user experience of your site and its functionality.

Compare your payment page to other similar payment pages

When compared against similar payment pages, you can see whether or not your page is accessible for customers to complete. This means the customer will have an easier time paying out of their account and getting the product they need. On the other hand, if your customer has difficulty using your payment page, it could be cause for concern. So check out these similar payment pages and see how yours stacks up.

Provide a transparent header for your payment form

To make sure your payment form is user-friendly, you need to provide a transparent header for your form. Here’s how:

  1. Add a clear title to the top of your page. This will tell people what they agree to when they click on the link to pay for goods or services.
  2. Include a visible button that says “Pay Now,” “Continue Shopping,” or something similar in large, bold letters so that people can pay more easily without having to scroll down the page first.
  3. If possible, use color contrast to highlight essential elements of the form (like buttons) so that they stand out among other elements on the page—this will make it easier for users to find what they’re looking for and click on it quickly.

Provide a transparent header for your payment form

The best way to ensure that your payment page is easy to find is by adding a search bar at the top of your e-commerce page. This will allow users to quickly find the payment form and make it easier to complete their purchases.
If you can eliminate most of the common mistakes, you’ll be well on your way to a user-friendly payment page. To do so, follow these simple suggestions and ensure you simulate customer experience.
Payment Page is a fantastic way to start accepting payments on your WordPress site. Check out our pricing for details or download the free version.
Categories
WordPress Accepting Online Payments PayPal

How To Integrate PayPal Into Your Website Using Payment Page WordPress Plugin

Wouldn’t it be great if your customers could make payments right on your website? It saves customers time and improves their overall experience.

To do that, you need to integrate an online payment gateway into your website.

PayPal is one of the most popular online payment gateways, trusted by 429 million users worldwide. PayPal’s available in 200 countries and supports 25 currencies.

Adding a PayPal-powered payment page to your WordPress website is simple. WordPress plugins, like Payment Page, make it possible.

Let’s go over how PayPal works and how to use Payment Page to integrate PayPal into your WordPress website:

How PayPal Works

Payment Page WordPress Plugin for PayPal

How To Integrate PayPal Into Your Website

Final Thoughts: Using Payment Page Plugin for WordPress PayPal Integration

How PayPal Works

PayPal acts as an intermediary between online merchants and customers. It enables customers to pay using methods like credit cards, debit cards, or their PayPal balance.

So, when a customer completes a payment, PayPal works with the customer’s bank to collect the money. Then, it transfers the money to the merchant’s account.

PayPal Payment Gateway Fees

You don’t need to pay recurring subscription fees to accept payments through PayPal. Instead, PayPal charges a fee whenever a merchant receives payment:

PayPal Checkout: 3.49% + a fixed fee based on currency received

Standard debit and credit payments: 2.99% + fixed fee

Pay with Venmo: 3.49% + fixed fee

Alternate payment methods (like Apple Pay or Google Pay): 2.59% + fixed fee


Note: PayPal charges an additional 1.5% fee on international transactions.

Using PayPal on WordPress To Accept Payments

You have multiple options to integrate PayPal into your WordPress website.

PayPal Payments Standard

PayPal payments standard lets you create simple payment buttons for your WordPress website. PayPal generates an HTML code for your payment button, and then you just need to embed the code on your website.

PayPal payment buttons are simple to create, but they’re only useful if your requirements are simple. They don’t support advanced customization options or multiple payment plans.

Payment Page WordPress Plugin for PayPal

If you want to go beyond the basic PayPal payment button, try Payment Page WordPress plugin. It empowers you to create beautiful payment forms powered by PayPal right on your website.

Payment Page offers advanced features for:

  • Creating fully-customized payment pages
  • Adding complex pricing plans — subscriptions and one-time payments
  • Accepting payments in 135+ currencies

Let’s see what Payment Page can do for your online business.

Multiple Payment Plans

Payment Page supports multiple payment plans suitable for any online business. For example:

  • Creators can set up subscription plans
  • Consultants can create multiple consultation forms
  • NGOs can accept custom amounts and recurring payments

Multiple Payment Methods

Payment Page gives your customers the flexibility to pay through different payment methods supported by PayPal:

  • Payment through their PayPal account
  • Payment using credit or debit card without a PayPal account

More payment methods are coming soon:

What’s Needed To Accept PayPal Payments Through Payment Page

To start, you need a PayPal business account to accept payments as a merchant. To integrate PayPal into your website, log into your PayPal developer account and create a new PayPal application to accept payments.

Once you create an application, you’ll get a Client ID and Secret code to enable PayPal payments on your WordPress website. 

Note: Payment Page offers a live and test mode for setting up PayPal. The test mode enables you to transfer money from your personal PayPal account to the business account for test purposes. The live mode lets you accept payments directly from your customers.

You can also use Webhooks.

How To Integrate PayPal Into Your Website

  1. Download Payment Page WordPress plugin
  2. Copy your PayPal application’s Client ID and Secret
  3. Connect your PayPal account using the Client ID and Secret
  4. Choose a payment page template, customize, and publish

Final Thoughts: Using Payment Page Plugin for WordPress PayPal Integration

Integrating PayPal into your WordPress website empowers you to offer easy payment options for your customers, improving their experience and boosting conversations. However, you might require more features than a standard PayPal payment button can offer.

Payment Page WordPress plugin solves that issue by offering versatile payment forms powered by PayPal. Ready to add a beautiful payment page to your website? Try Payment Page today.

Categories
Accepting Online Payments Stripe WordPress

How To Accept Payments With Stripe for WordPress

Are you a freelancer or entrepreneur running a business through WordPress? Adding a payment option right on your website is a great way to increase conversions.

According to a study by the Baymard Institute, 18% of customers abandon their carts due to a complicated checkout process. Adding a payment option to your website instead of redirecting your customers to a third-party payment page will simplify your checkout process and increase your conversion rates.

So, how do you enable payments through your WordPress website?

You’ll need a payment gateway.

A payment gateway is a service that acts as an intermediary for monetary transactions between a buyer and a seller. Payment gateways enable customers to use different payment methods such as wallets, credit cards, debit cards, and bank transfers.

In recent years, many payment gateway providers have appeared on the market. Stripe and PayPal are among the most popular gateways — around 3.2 million websites across the globe use Stripe to accept online payments. Stripe offers easy setup and a flat rate fee, making it an excellent choice for freelancers and other small businesses.

To set up Stripe for your WordPress website, you’ll need to install a To set up Stripe for your WordPress website, you’ll need to install a Stripe WordPress plugin, like Payment Page.

Let’s see how you can use Stripe for WordPress to accept payments and donations.

Here’s what you’ll learn:

Stripe Payment Gateway Basics

Setting up Stripe for WordPress is quick and easy with Payment Page

Stripe is a payment processing platform that lets customers pay on a merchant’s website. When a customer makes a payment on a website, Stripe processes that payment and transfers it to the seller’s account.

Stripe Supported Payment Methods

Stripe offers diverse payment options, empowering your customers to pay using their preferred payment method.

The Baymard Institute study found that 9% of customers abandon their online shopping carts if there aren’t enough payment methods. While that number may not seem high, why take the risk when you don’t have to?

Offering diverse payment choices by setting up Stripe for WordPress will help your customers quickly finish the checkout process.

Stripe supports a wide range of payment options for online transactions, such as:

  • Credit and debit cards
  • Wallets, including:
    • Google Pay
    • Apple Pay
    • Alipay
    • WeChat Pay
    • Microsoft Pay
    • Click to Pay
  • Bank directs debits and credit transfers
  • Bank redirects
  • Buy now, pay later methods

How Does Stripe Work?

A business needs a merchant account to accept credit or debit card payments. When you use the Stripe payment gateway, you won’t need to open a merchant account as you’ll be using Stripe’s.

Here’s what happens when a customer makes an online payment on your Stripe-powered WordPress site:

  • Stripe encrypts the payment information and sends it to the business’s bank (acquirer).
  • The transaction passes through the credit card network to the customer’s issuing bank.
  • The issuing bank verifies the transaction and transfers money to the acquiring bank.
  • The acquiring bank deposits the money in Stripe’s merchant account.
  • Stripe transfers the money from the merchant account to the online store owner’s account.

Stripe Payment Gateway Fees

Stripe doesn’t have monthly or yearly fees. Instead, it debits fees per transaction. Stripe charges a flat rate of 2.9% plus 30 cents per transaction for online wallets and debit and credit card payments.

For bank account transfers, Stripe charges the below transaction fees based on the type of transaction:

  • ACH credit: $1 per transaction
  • ACH debit: 0.8% per transaction
  • Wire transfer: $8 per transfer

Now that you know how Stripe works, let’s get into how to set up Stripe on your WordPress website.

How To Set Up Stripe on WordPress

After opening a Stripe account, you’ll need to install a Stripe WordPress plugin to start accepting payments on your WordPress website.

E-commerce plugins like WooCommerce come with Stripe integrated. If you don’t want to create a complete e-commerce checkout, go for a standalone Stripe plugin like Payment Page.

Stripe also offers a new payment link feature where merchants can create Stripe-hosted payment links and share them across emails, messages, or chats. Alternatively, you can redirect your customers to a page hosted by a third-party payment gateway.

Let’s look at each of these options in detail.

Standalone Stripe WordPress Plugins

Stripe WordPress plugins are the simplest way to set up a payment page on your website. Some of these plugins offer both free and premium plans. You’ll find two types of Stripe plugins:

Plugins for Payment Buttons

If you have a product page and need simple payment buttons, you can use plugins like WP Simple Pay. Once a customer clicks the pay button, a payment form pops up to collect the customer’s card details.

While these plugins are simple, they offer a very basic payment form. You won’t be able to customize your payment page or collect additional customer information.

Stripe Plugins With Payment Form

If you want to create a beautiful payment page to match your brand, you need to go for form-based Stripe plugins. These plugins will integrate Stripe with your website and empower you to design a customized payment page.

You’ll find several form-based payment plugins like Payment Page and WPForms. Some of these plugins provide a simple form with basic customizations. But plugins like Payment Page offer advanced customization and styling options to create versatile payment pages.

Accept Stripe payments through customizable payment forms.

Top Stripe WordPress Plugins

Here are a few standalone Stripe WordPress plugins that’ll help you enable Stripe payments:

  • Payment Page
  • WPForms
  • PaySimple
  • WP Simple Pay Lite/Pro
  • WP Full Stripe
  • WPSmartPay

Stripe Integrated E-Commerce Plugins

If you’re planning to build an online store with a full e-commerce checkout flow, you can go for WooCommerce or Easy Digital Downloads. These plugins come with Stripe integration.

While this option is suitable for an e-commerce store, building a full-fledged WooCommerce store might be overkill if you just need to offer a few services or set up a subscription service.

Stripe Payment Links

Payment Links is a new Stripe functionality that helps you create a simple payment page hosted by Stripe. You can then share a link to your hosted payment page over email, WhatsApp, or social media channels.

While Stripe Payment Links is a simple option to set up a payment page, you’ll only get limited customization options. Also, a payment page hosted on a domain outside your business’s website might not look very professional.

Link to a Third-Party Payment Gateway

If you don’t want to make changes to your website, you can redirect your customers to a payment page hosted by a third party. While this option is quick and easy, redirecting your customers to a different page may add checkout delays and lead to cart abandonment.

How To Accept Payments on Your Website Through Stripe + Payment Page

Payment Page is a Stripe verified partner.

With Payment Page, you’ll be able to create beautiful, Stripe-powered payment forms that match your brand. Payment Page is a Stripe verified partner vetted by Stripe for security and quality of service.

Payment Page is suitable for freelancers, coaches, NGOs, and other online businesses. With a few simple steps, you can accept donations or create subscription plans.

Here’s a step-by-step guide on how to create a beautiful Stripe-powered payment form:

5 Steps To Set Up a Stripe-Powered Payment Form

Step 1: Download and install Payment Page on your WordPress website.

Payment Page offers a freemium account if you would like to experiment. We also offer Premium, Pro, and Personal plans if you need advanced features. Before starting out, ensure your website has an active SSL certificate for secure data transfer.

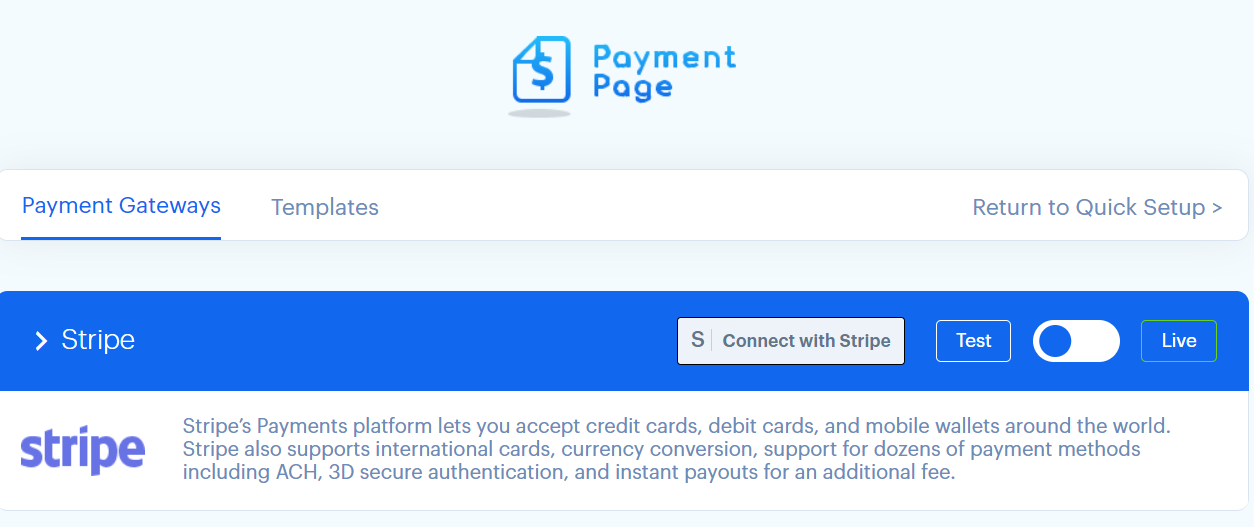
Step 2: Connect your Stripe account in test or live mode.

On your WordPress dashboard, click the Payment Page icon to connect your Stripe account to WordPress. You can connect Stripe in test mode first and if everything looks good, enable Stripe payments using the live mode.

Connect your Stripe account using Payment Page plugin

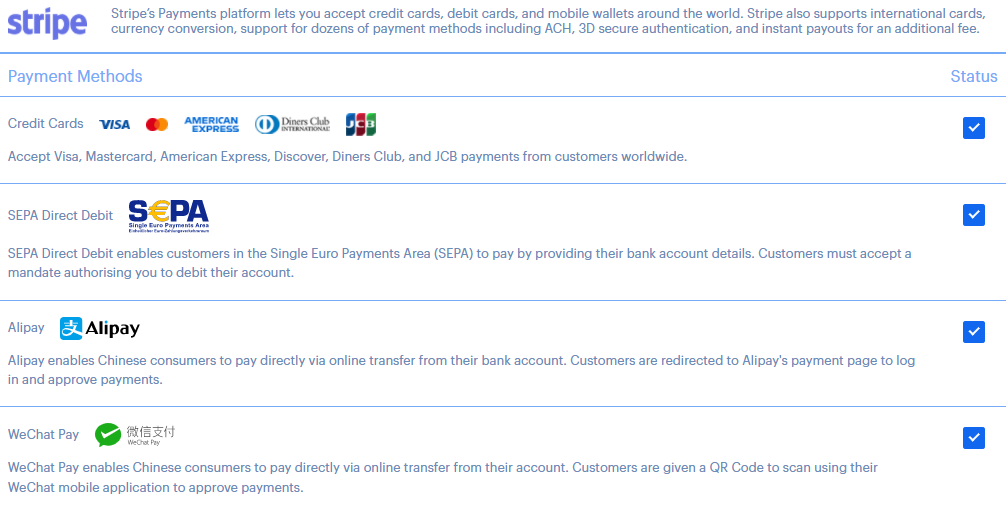
Step 3: Activate the Stripe payment options you want to include.

Payment Page supports all Stripe payment methods like credit cards, debit cards, and wallets. We’ve also added Plaid + Stripe integration to accept ACH direct debit or credit.

Choose the Stripe checkout options you want to offer

Step 4: Import and customize a template.

Payment Page has 11 stylish payment form templates to cater to any online business — freelancers, NGOs, coaches, agencies, or SaaS. Once you import a template, configure the fields of your payment form and save changes.

Payment Page has 11 beautiful templates, and we’ll add new templates soon.

Step 5: Publish your payment page and start accepting Stripe payments on your WordPress website.

Final Thoughts: Accept Online Payments by Setting Up Stripe for WordPress

Millions of websites rely on Stripe to accept online payments. Creating a Stripe-powered payment page will boost your conversion rate. Stripe is a PCI Level 1 service provider, which means you can trust the service with your customers’ credit card information.

You have multiple options to set up Stripe payments on your WordPress website, such as:

  • Stripe WordPress plugins like Payment Page
  • Stripe integrated e-commerce plugins
  • Stripe payment links
  • Third-party payment pages

Are you ready to take your business to the next level by accepting online payments? You only need a few minutes to set up a highly customized, Stripe verified payment form with Payment Page. Get started today.